<?xml version="1.0" encoding="utf-8"?><feed xmlns="http://www.w3.org/2005/Atom" ><generator uri="https://jekyllrb.com/" version="3.10.0">Jekyll</generator><link href="https://magicshawn.github.io/feed.xml" rel="self" type="application/atom+xml" /><link href="https://magicshawn.github.io/" rel="alternate" type="text/html" /><updated>2026-02-08T12:21:47+00:00</updated><id>https://magicshawn.github.io/feed.xml</id><title type="html">Sean’s Blog</title><subtitle>研究日常</subtitle><author><name>mgshawn</name></author><entry><title type="html">光伏清洁机器人定位与建图</title><link href="https://magicshawn.github.io/2025/05/02/graduation-project.html" rel="alternate" type="text/html" title="光伏清洁机器人定位与建图" /><published>2025-05-02T02:15:13+00:00</published><updated>2025-05-02T02:15:13+00:00</updated><id>https://magicshawn.github.io/2025/05/02/graduation-project</id><content type="html" xml:base="https://magicshawn.github.io/2025/05/02/graduation-project.html"><![CDATA[<h1 id="graduation-project">Graduation Project</h1>

<hr />

<p><strong>相关链接：</strong></p>

<p><a href="https://github.com/TixiaoShan/LIO-SAM"><em>LIO-SAM source code repositories</em></a></p>

<p><a href="https://github.com/HesaiTechnology/HesaiLidar_General_ROS"><em>LIDAR-DRIVER - HesaiLidar_General_ROS</em></a></p>

<p><a href="https://www.hesaitech.com/cn/download?sid_for_share=99125_3"><em>Hesai Lidar 产品资料下载</em></a></p>

<hr />

<h1 id="content">content</h1>
<ul>
  <li><a href="#测试条件"><strong>测试条件</strong></a></li>
  <li><a href="#项目结构"><strong>项目结构</strong></a>
    <ul>
      <li><a href="#文件夹结构"><em>1.文件夹结构</em></a></li>
    </ul>
  </li>
  <li><a href="#项目部署"><strong>项目部署</strong></a>
    <ul>
      <li><a href="#仿真部分"><em>1.仿真部分</em></a></li>
      <li><a href="#实际部署部分"><em>2.实际部署部分</em></a></li>
    </ul>
  </li>
  <li><a href="#reference"><strong>Some Reference</strong></a></li>
</ul>

<hr />

<h2 id="测试条件">一. 测试条件</h2>

<ul>
  <li>
    <p><strong>ROS版本 :</strong> <strong><em>Noetic</em></strong></p>
  </li>
  <li><strong>系统 :</strong> <strong><em>Ubuntu 20.04 Jetson AGX Orin</em></strong></li>
  <li><strong>激光雷达 :</strong> <strong><em>Hesai-Pandar-XT-16</em></strong></li>
  <li><strong>IMU :</strong> <strong><em>WHEELTEC-N100</em></strong></li>
  <li><strong>RTK :</strong> <strong><em>WHEELTEC-G70</em></strong></li>
</ul>

<hr />

<h2 id="项目结构">二. 项目结构</h2>

<h3 id="文件夹结构">1.文件夹结构</h3>
<p><strong><em>核心文件目录如下：</em></strong>
包含两个部分:</p>
<ul>
  <li><strong>graduation_slam_benchmark</strong> : <strong><em>激光雷达建图定位算法,包含多种算法测试以及实际部署的代码与功能包</em></strong></li>
  <li><strong>Photovoltaic_robot_simulator</strong> : <strong><em>机器人仿真代码与功能包</em></strong></li>
</ul>

<div class="language-bash highlighter-rouge"><div class="highlight"><pre class="highlight"><code>./Work_space
├── graduation_slam_benchmark
│   ├── build
│   ├── datasheet
│   ├── devel
│   ├── log
│   ├── logs
│   ├── scripts
│   └── src
├── Photovoltaic_robot_simulator
│   ├── assets
│   ├── build
│   ├── datasheets
│   ├── devel
│   ├── logs
│   ├── README.md
│   ├── scripts
│   └── src

</code></pre></div></div>
<hr />

<h2 id="项目部署">三. 项目部署</h2>

<h3 id="仿真部分">1.仿真部分</h3>

<p><strong><em>核心文件目录如下：</em></strong></p>

<div class="language-bash highlighter-rouge"><div class="highlight"><pre class="highlight"><code>./src
├── hardware_driver
│   └── livox_ros_driver
├── robot_simulator
│   ├── robot_control    <span class="c"># 机器人控制功能包</span>
│   └── robot_description <span class="c"># 机器人描述文件</span>
├── slam_algorithm
│   ├── ego-planner <span class="c"># ego-planner算法</span>
│   ├── FAST_LIO
│   ├── FAST_LIO_LOCALIZATION <span class="c"># FAST_LIO_LOCALIZATION 重定位算法</span>
│   └── FAST_LIO_SAM <span class="c"># FAST_LIO_SAM 定位建图算法</span>
└── velodyne_simulator

</code></pre></div></div>

<h4 id="运行指令">运行指令</h4>
<p>为方便实际运行常用的启动指令都写在对应ROS工作空间下的 <strong><em>/script</em></strong> 文件夹中</p>

<p><strong>启动机器人人仿真</strong></p>
<div class="language-bash highlighter-rouge"><div class="highlight"><pre class="highlight"><code>roslaunch robot_description gazebo.launch
</code></pre></div></div>

<p><strong>启动机器人控制</strong></p>

<p>此时机器人接受键盘控制</p>
<div class="language-bash highlighter-rouge"><div class="highlight"><pre class="highlight"><code><span class="c"># move control</span>
roslaunch robot_control velocity_controller.launch 
</code></pre></div></div>
<p><strong>开启键盘控制</strong></p>

<p>键盘控制机器人移动</p>
<div class="language-bash highlighter-rouge"><div class="highlight"><pre class="highlight"><code><span class="c"># start to control robot by Keyboard</span>
rosrun teleop_twist_keyboard teleop_twist_keyboard.py
</code></pre></div></div>
<p><strong>开启激光雷达建图</strong></p>
<div class="language-bash highlighter-rouge"><div class="highlight"><pre class="highlight"><code><span class="c">#算法运行</span>
roslaunch fast_lio_sam mapping_solar_robot.launch
<span class="c">#开启可视化</span>
rosrun rviz rviz <span class="nt">-d</span> <span class="si">$(</span>rospack find fast_lio_sam<span class="si">)</span>/rviz_cfg/loam_livox.rviz

</code></pre></div></div>

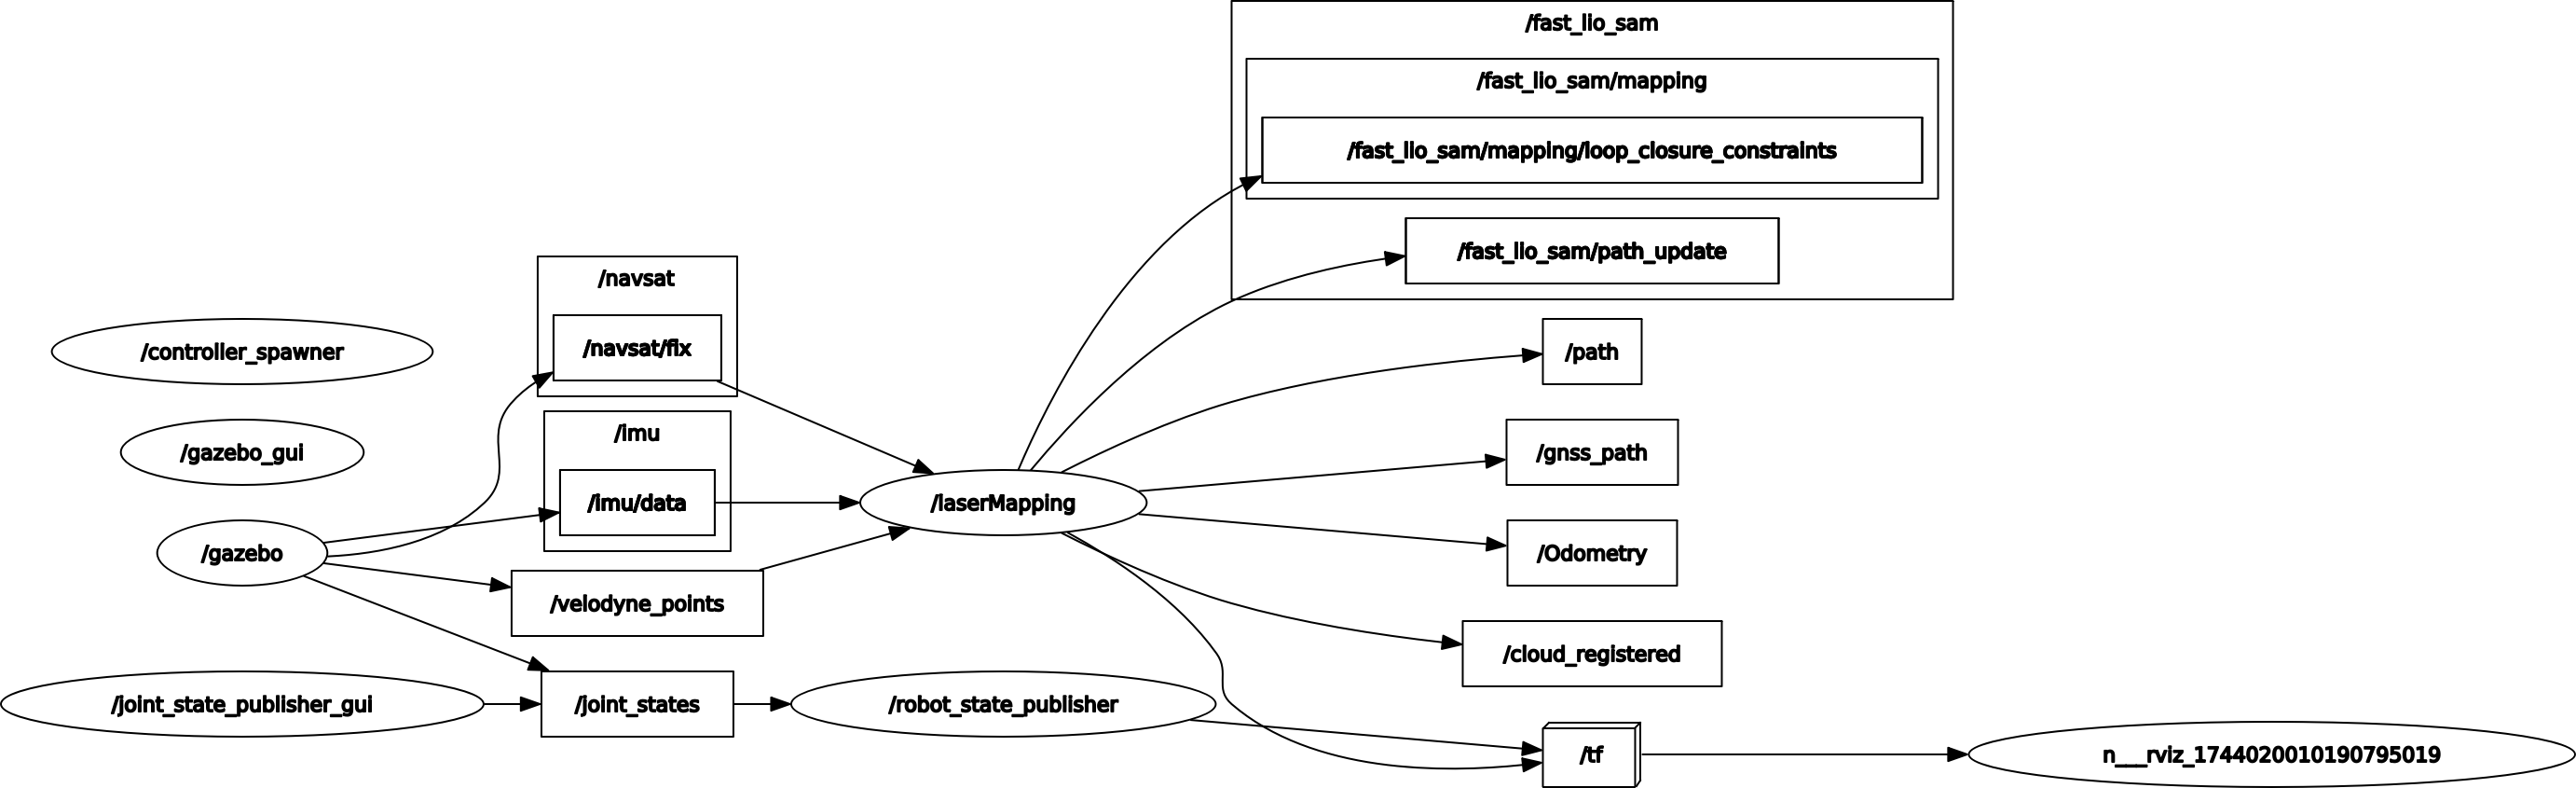
<p><strong>系统节点树</strong>
<img src="/img/posts/page8/rosgraph.png" alt="system_node" width="720" /></p>

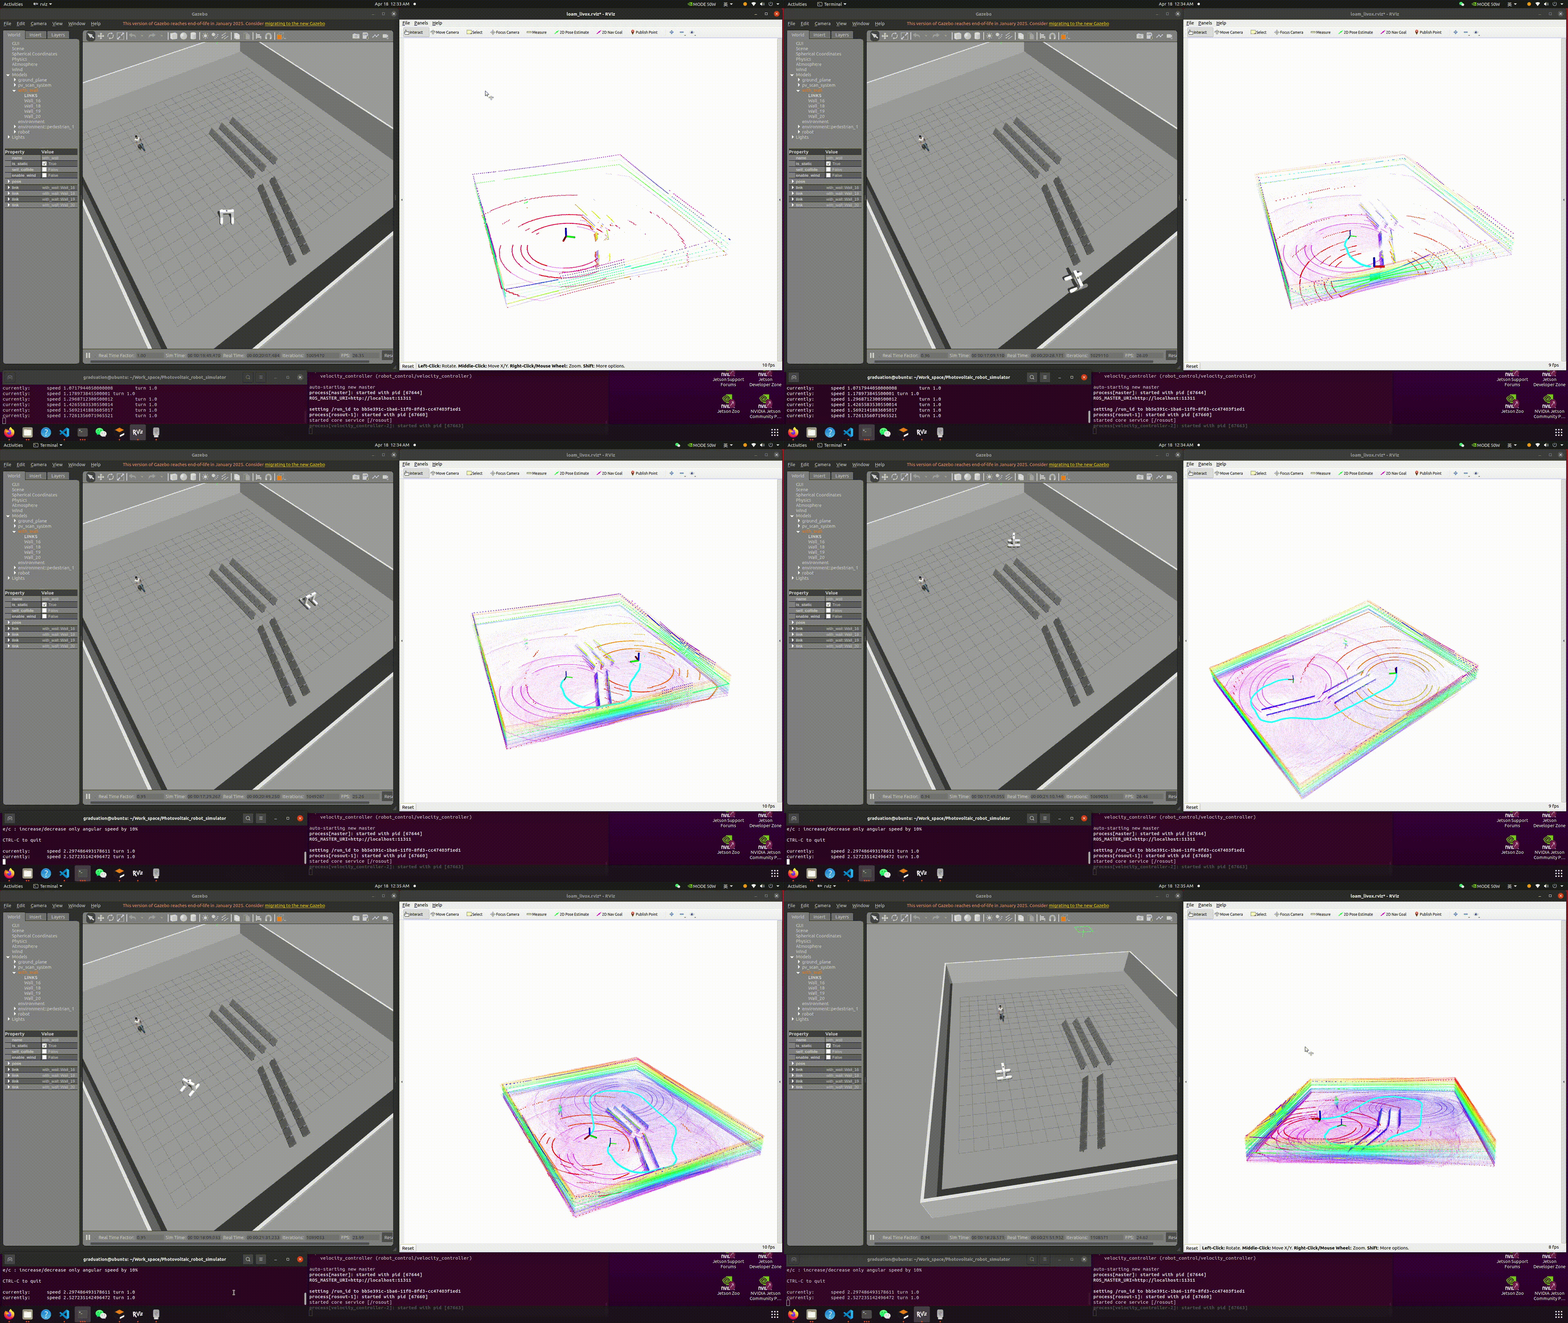
<p><strong>实际效果演示</strong>
<img src="/img/posts/page8/map_scans.gif" alt="slam_result" width="720" /></p>

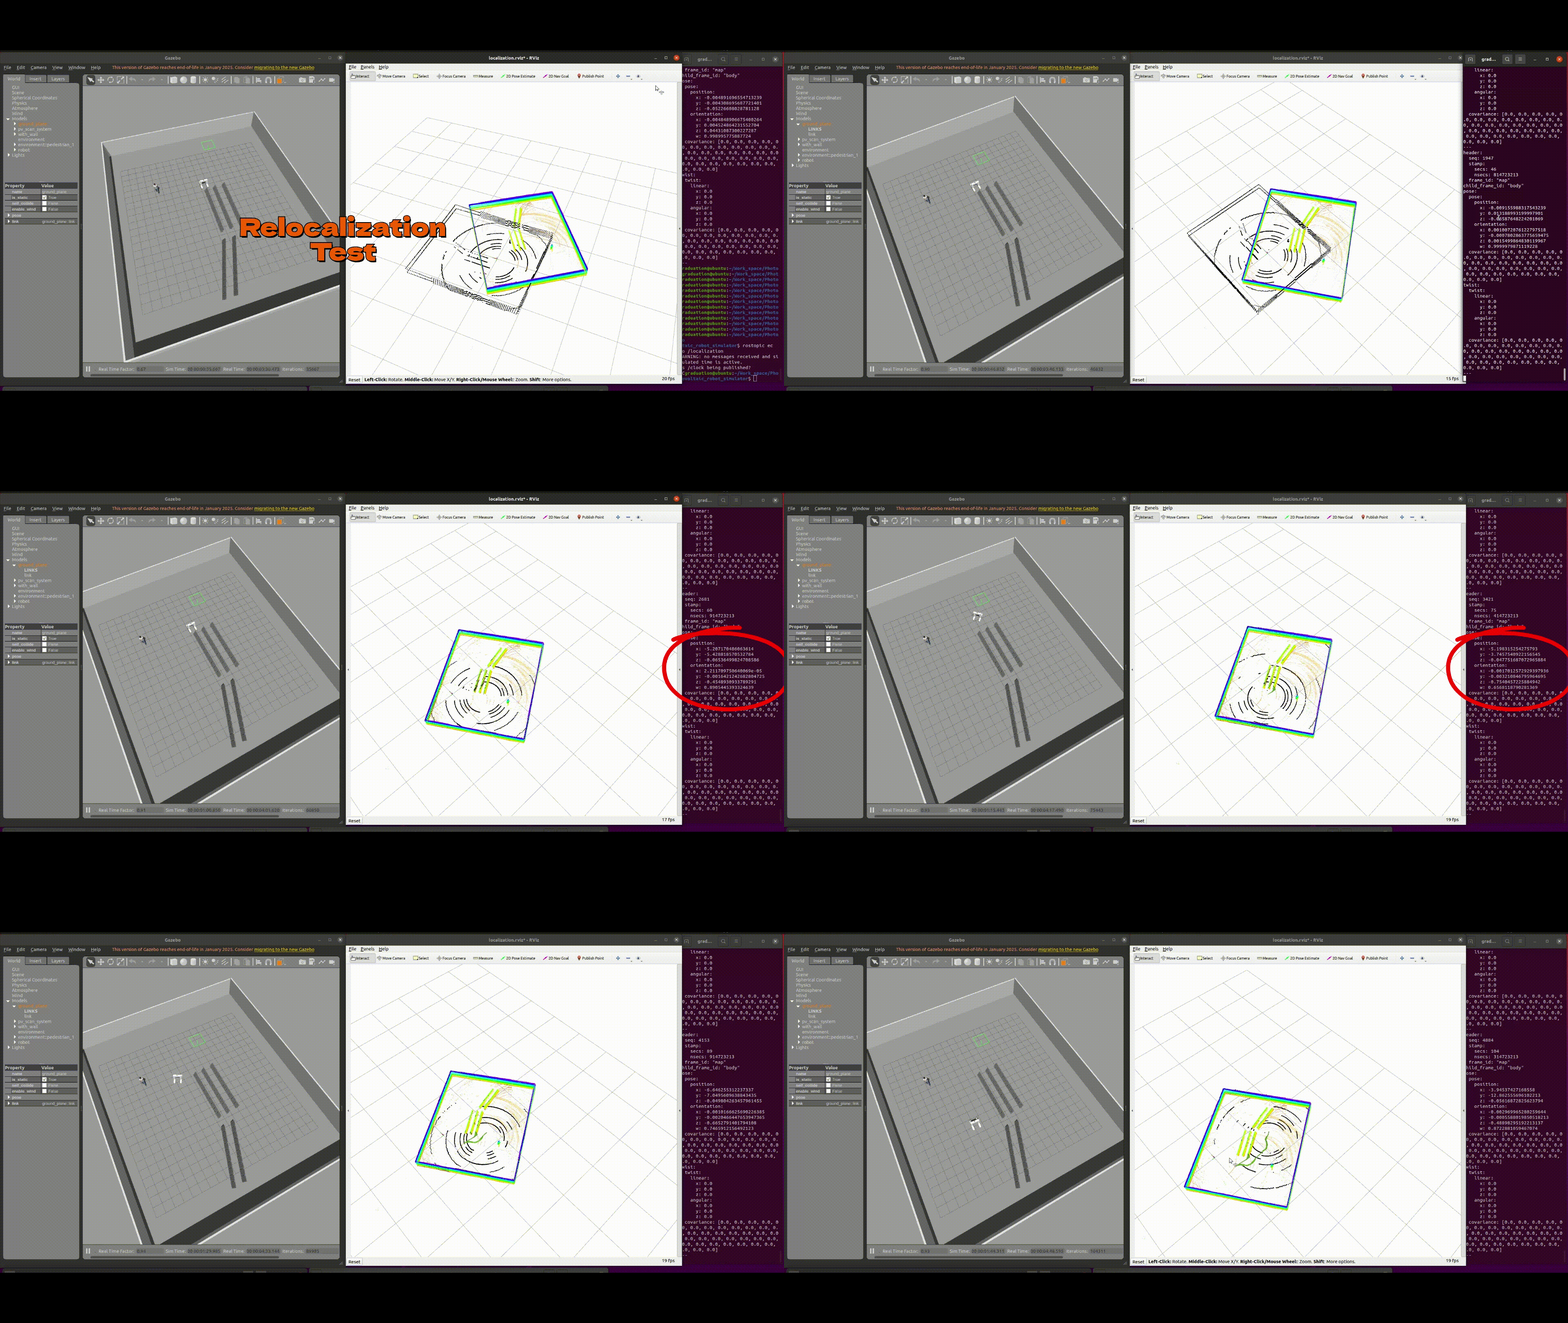
<h4 id="重定位模块">重定位模块</h4>

<p><strong>开启重定位</strong></p>
<div class="language-bash highlighter-rouge"><div class="highlight"><pre class="highlight"><code><span class="c">#reference</span>
roslaunch fast_lio_localization localization_velodyne.launch
</code></pre></div></div>
<p><img src="/img/posts/page8/Relocalization.gif" alt="slam_relocalization" width="720" /></p>

<hr />

<h3 id="实际部署部分">2.实际部署部分</h3>

<p><strong><em>核心文件目录如下：</em></strong></p>

<div class="language-bash highlighter-rouge"><div class="highlight"><pre class="highlight"><code>./src/
├── data_perception <span class="c"># 数据处理</span>
│   ├── hesai_to_velodyne <span class="c"># 激光雷达预处理</span>
│   ├── LiDAR_IMU_Init <span class="c"># IMU-LiDAR外参标定</span>
│   └── odom_to_kitti <span class="c"># 里程计转kitti格式</span>
├── hardware_driver <span class="c"># 传感器驱动</span>
│   ├── fdilink_ahrs
│   ├── gnss
│   ├── HesaiLidar_General_ROS
│   ├── livox_ros_driver
│   └── usb_cam
└── localization <span class="c"># 定位建图算法</span>
    ├── A-LOAM
    ├── FAST_LIO
    ├── FAST_LIO_SAM <span class="c"># 主要使用的算法</span>
    ├── LeGO-LOAM
    └── LIO-SAM

</code></pre></div></div>
<h4 id="实际部署部分启动指令如下">实际部署部分启动指令如下：</h4>

<p>为方便实际运行常用的启动指令都写在对应ROS工作空间下的 <strong><em>/script</em></strong> 文件夹中</p>

<p><strong>一键启动脚本:</strong></p>

<p><strong><em>graduation_slam_benchmark</em></strong> 工作空间下的 <strong><em>/script</em></strong> 文件夹中</p>
<div class="language-bash highlighter-rouge"><div class="highlight"><pre class="highlight"><code>./script/start_slam_system.sh
</code></pre></div></div>

<p><strong>GPS驱动</strong></p>

<div class="language-bash highlighter-rouge"><div class="highlight"><pre class="highlight"><code><span class="c"># 1. 启动 GPS 驱动节点</span>
<span class="nb">source </span>devel/setup.bash <span class="o">&amp;&amp;</span> roslaunch wheeltec_gps_driver wheeltec_nmea_driver.launch
</code></pre></div></div>

<p><strong>AHRS驱动</strong></p>
<div class="language-bash highlighter-rouge"><div class="highlight"><pre class="highlight"><code><span class="c"># 2. 启动 AHRS 驱动节点</span>
<span class="nb">source </span>devel/setup.bash <span class="o">&amp;&amp;</span> <span class="nb">sudo chmod </span>666 /dev/ttyUSB0 <span class="o">&amp;&amp;</span> roslaunch fdilink_ahrs ahrs_data.launch
</code></pre></div></div>

<p><strong>启动 PTP 时间同步服务</strong></p>
<div class="language-bash highlighter-rouge"><div class="highlight"><pre class="highlight"><code><span class="c"># 3. 启动 PTP 时间同步服务（需要 sudo 权限）</span>
<span class="nb">sudo </span>ptp4l <span class="nt">-m</span> <span class="nt">-4</span> <span class="nt">-i</span> eth0 <span class="nt">-S</span>
</code></pre></div></div>

<p><strong>激光雷达驱动</strong></p>
<div class="language-bash highlighter-rouge"><div class="highlight"><pre class="highlight"><code><span class="c"># 4. 启动 Hesai 激光雷达驱动</span>
<span class="nb">source </span>devel/setup.bash <span class="o">&amp;&amp;</span> roslaunch hesai_lidar hesai_lidar.launch

</code></pre></div></div>

<p><strong>FAST-LIO-SAM 算法</strong></p>
<div class="language-bash highlighter-rouge"><div class="highlight"><pre class="highlight"><code><span class="c"># 5. 启动 FAST-LIO-SAM 算法</span>
<span class="nb">source </span>devel/setup.bash <span class="o">&amp;&amp;</span> roslaunch fast_lio_sam mapping_velodyne16_lio_sam_parking_dataset.launch
</code></pre></div></div>

<h4 id="效果演示">效果演示:</h4>
<p><img src="/img/posts/page8/circle.gif" alt="slam-fact" width="720" /></p>

<hr />

<h2 id="reference">四. Some Reference</h2>

<p><a href="https://github.com/kahowang/FAST_LIO_SAM"><strong><em>1.FAST-LIO-SAM仓库</em></strong></a></p>

<p><a href="https://github.com/HViktorTsoi/FAST_LIO_LOCALIZATION"><strong><em>2.重定位算法</em></strong></a></p>

<p><a href="https://github.com/LihanChen2004/pb_rm_simulation"><strong><em>3.RM仿真项目-pb_rm_simulation</em></strong></a></p>

<p><a href="https://www.cmu-exploration.com/"><strong><em>4.卡耐基梅隆-自主探索开发环境</em></strong></a></p>]]></content><author><name>mgshawn</name></author><summary type="html"><![CDATA[Graduation Project]]></summary></entry><entry><title type="html">Hesai-Pandar-XT-16/N100-MINI 运行LIO-SAM</title><link href="https://magicshawn.github.io/2024/10/28/Hesai-Pandar-XT-16-N100-MINI-%E8%BF%90%E8%A1%8CLIO-SAM.html" rel="alternate" type="text/html" title="Hesai-Pandar-XT-16/N100-MINI 运行LIO-SAM" /><published>2024-10-28T02:15:13+00:00</published><updated>2024-10-28T02:15:13+00:00</updated><id>https://magicshawn.github.io/2024/10/28/Hesai-Pandar-XT-16-N100-MINI-%E8%BF%90%E8%A1%8CLIO-SAM</id><content type="html" xml:base="https://magicshawn.github.io/2024/10/28/Hesai-Pandar-XT-16-N100-MINI-%E8%BF%90%E8%A1%8CLIO-SAM.html"><![CDATA[<h1 id="lio-sam-运行">LIO-SAM 运行</h1>

<hr />

<p><strong>相关链接：</strong></p>

<p><a href="https://github.com/TixiaoShan/LIO-SAM"><em>LIO-SAM source code repositories</em></a></p>

<p><a href="https://github.com/HesaiTechnology/HesaiLidar_General_ROS"><em>LIDAR-DRIVER - HesaiLidar_General_ROS</em></a></p>

<p><a href="https://www.hesaitech.com/cn/download?sid_for_share=99125_3"><em>Hesai Lidar 产品资料下载</em></a></p>

<hr />

<h1 id="content">content</h1>
<ul>
  <li><a href="#测试条件"><strong>测试条件</strong></a></li>
  <li><a href="#安装"><strong>安装</strong></a>
    <ul>
      <li><a href="#驱动安装"><em>1.设备驱动安装</em></a>
        <ul>
          <li><a href="#激光雷达驱动安装"><em>激光雷达驱动安装</em></a></li>
          <li><a href="#IMU驱动"><em>IMU驱动安装</em></a></li>
        </ul>
      </li>
      <li><a href="#LIO-SAM安装"><em>2.LIO-SAM安装</em></a></li>
    </ul>
  </li>
  <li><a href="#运行"><strong>系统配置</strong></a>
    <ul>
      <li><a href="#参数配置"><em>各ROS参数包配置</em></a></li>
      <li><a href="#参数标定"><em>传感器参数标定</em></a></li>
      <li></li>
    </ul>
  </li>
  <li><a href="#总结"><strong>总结</strong></a></li>
  <li><a href="#reference"><strong>Some Reference</strong></a></li>
</ul>

<hr />

<h2 id="测试条件">一. 测试条件</h2>

<ul>
  <li><strong>系统 :</strong> <strong><em>Ubuntu 18.04 DJI-manifold2-C</em></strong></li>
  <li><strong>激光雷达 :</strong> <strong><em>Hesai-Pandar-XT-16</em></strong></li>
  <li><strong>IMU :</strong> <strong><em>WHEELTEC-N100-mini</em></strong></li>
</ul>

<hr />

<h2 id="安装">二. 安装</h2>

<h3 id="驱动安装">1.设备驱动安装</h3>

<h4 id="激光雷达驱动安装">激光雷达驱动安装</h4>

<div class="language-bash highlighter-rouge"><div class="highlight"><pre class="highlight"><code>    ...
    <span class="nb">mkdir</span> <span class="nt">-p</span> ~/catkin_ws/src
    <span class="nb">cd </span>catkin_ws/src
    git clone https://github.com/HesaiTechnology/HesaiLidar_General_ROS.git <span class="nt">--recursive</span>
    
    <span class="c">#back to the catkin_ws directory</span>
    <span class="nb">cd</span> ../
    caktin_make
    ...
</code></pre></div></div>

<p><strong>详细安装步骤见：</strong>
<a href="https://github.com/HesaiTechnology/HesaiLidar_General_ROS"><em>LIDAR-DRIVER - HesaiLidar_General_ROS</em></a></p>

<p><strong>bug编译排查</strong></p>

<p>在编译 <strong><em>HesaiLidar_General_ROS package</em></strong> 过程中遇到了一些问题，具体如下：</p>
<pre><code class="language-log">    fatal error: hesai_lidar/PandarScan.h: No such file or directory #include "hesai_lidar/PandarScan.h"
</code></pre>
<p>参照 <a href="https://github.com/HesaiTechnology/HesaiLidar_General_ROS/issues/24">驱动仓库issue - PandarScan.h：没有此文件或目录</a></p>

<div class="language-bash highlighter-rouge"><div class="highlight"><pre class="highlight"><code>    <span class="nb">cd</span> ~/catkin_ws/src/HesaiLidar_General_ROS
    vi CMakeLists.txt
    <span class="c">#48行：添加依赖</span>
    add_dependencies<span class="o">(</span>PandarGeneral hesai_lidar_generate_messages_cpp<span class="o">)</span>

</code></pre></div></div>

<h4 id="IMU驱动">IMU驱动安装</h4>

<p><strong>驱动下载:</strong>
<a href="https://pan.baidu.com/s/1vyT1Qqz5RC151n-E1nxggw"><em>惯导&amp;GNSS/GPS模块资料</em></a></p>

<p>解压到工作空间 <strong><em>src/</em></strong> 目录下</p>
<div class="language-bash highlighter-rouge"><div class="highlight"><pre class="highlight"><code>    ...
    <span class="nb">cd </span>catkin_ws/src
    unzip fdilink_ahrs_ROS1.zip
    ...
</code></pre></div></div>
<p><strong>详细安装步骤见：</strong>
<a href="https://blog.csdn.net/qq_57061492/article/details/136722204?spm=1001.2101.3001.6650.1&amp;utm_medium=distribute.pc_relevant.none-task-blog-2%7Edefault%7EBlogCommendFromBaidu%7ECtr-1-136722204-blog-124779753.235%5Ev43%5Epc_blog_bottom_relevance_base4&amp;depth_1-utm_source=distribute.pc_relevant.none-task-blog-2%7Edefault%7EBlogCommendFromBaidu%7ECtr-1-136722204-blog-124779753.235%5Ev43%5Epc_blog_bottom_relevance_base4&amp;utm_relevant_index=2"><em>轮趣IMU-N100 ROS驱动安装</em></a></p>

<h3 id="LIO-SAM安装">2.LIO-SAM安装</h3>

<p>同样在 <strong><em>src/</em></strong> 目录下克隆仓库</p>
<div class="language-bash highlighter-rouge"><div class="highlight"><pre class="highlight"><code>    ...
    <span class="nb">cd </span>catkin_ws/src
    git clone https://github.com/TixiaoShan/LIO-SAM.git
    ...
</code></pre></div></div>
<p><strong>详细安装步骤见：</strong>
<a href="https://github.com/TixiaoShan/LIO-SAM"><em>LIO-SAM source code repositories</em></a></p>

<hr />

<h2 id="运行">三. 系统运行</h2>

<h3 id="配置修改">1. 配置修改</h3>

<div class="language-bash highlighter-rouge"><div class="highlight"><pre class="highlight"><code>    <span class="nb">cd </span>catkin_ws
    catkin_make
</code></pre></div></div>

<h3 id="传感器校准">2.传感器校准</h3>

<h4 id="imu校准">IMU校准：</h4>

<div class="language-bash highlighter-rouge"><div class="highlight"><pre class="highlight"><code>rosbag info /home/dji/Work_Space/FAST_LIO/tools/datasheet/N100-mimini-2h.bag 
</code></pre></div></div>

<div class="language-bash highlighter-rouge"><div class="highlight"><pre class="highlight"><code>path:        /home/dji/Work_Space/FAST_LIO/tools/datasheet/N100-mimini-2h.bag
version:     2.0
duration:    2hr 9:09s <span class="o">(</span>7749s<span class="o">)</span>
start:       Nov 18 2024 13:13:08.98 <span class="o">(</span>1731906788.98<span class="o">)</span>
end:         Nov 18 2024 15:22:18.18 <span class="o">(</span>1731914538.18<span class="o">)</span>
size:        279.4 MB
messages:    774928
compression: none <span class="o">[</span>361/361 chunks]
types:       sensor_msgs/Imu <span class="o">[</span>6a62c6daae103f4ff57a132d6f95cec2]
topics:      /imu   774928 msgs    : sensor_msgs/Imu
</code></pre></div></div>

<p><strong><em>(1)</em> 安装校准工具</strong></p>

<p>仓库地址：<a href="https://github.com/gaowenliang/imu_utils"><em>校准工具包 imu_utils</em></a></p>

<div class="language-bash highlighter-rouge"><div class="highlight"><pre class="highlight"><code>    <span class="nb">cd </span>catkin_ws/src
    git clone https://github.com/gaowenliang/code_utils.git
    git clone https://github.com/gaowenliang/imu_utils.git
    <span class="nb">cd</span> ~/catkin_ws

    <span class="c"># 依次单独编译</span>
    catkin_make <span class="nt">-DCATKIN_WHITELIST_PACKAGES</span><span class="o">=</span>code_utils
    catkin_make <span class="nt">-DCATKIN_WHITELIST_PACKAGES</span><span class="o">=</span>imu_tuils
</code></pre></div></div>
<p>编译bug修复：</p>

<div class="language-bash highlighter-rouge"><div class="highlight"><pre class="highlight"><code>    <span class="c">#openCV版本不匹配</span>

    <span class="c"># edit for build bug fix </span>
    row 84/107: CV_LOAD_IMAGE_GRAYSCALE 改为 cv::IMREAD_GRAYSCALE
    row 94/117: CV_MINMAX 改为 NORM_MINMAX

    vim src/code_utils/src/mat_io_test.cpp
    row 33: CV_LOAD_IMAGE_UNCHANGED 改为 cv::IMREAD_UNCHANGED

    <span class="c"># 头文件缺失</span>
    error: aggregate ‘std::ofstream out_t’ has incomplete <span class="nb">type </span>and cannot be defined
    std::ofstream out_t<span class="p">;</span>

    vim src/imu_utils/src/imu_utils.cpp
    row22: <span class="c">#include&lt;fstream&gt;</span>

    fatal error: backward.hpp: No such file or directory
    <span class="c">#include "backward.hpp"</span>

    vim src/code_utils/src/sumpixel_test.cpp
    row2: <span class="c">#include "backward.hpp" 改为 #include "code_utils/backward.hpp" </span>

</code></pre></div></div>
<p><strong>详细参考:</strong> <em><a href="https://blog.yanjingang.com/?p=9414">Pandar40P Lidar + H30 IMU 外参标定</a></em></p>

<h3 id="2-运行">2. 运行</h3>

<div class="language-bash highlighter-rouge"><div class="highlight"><pre class="highlight"><code>    <span class="nb">source </span>devel/setup.bash
    roslaunch PandarGeneral pandargeneral.launch
    roslaunch lio_sam run.launch
</code></pre></div></div>]]></content><author><name>mgshawn</name></author><summary type="html"><![CDATA[LIO-SAM 运行]]></summary></entry><entry><title type="html">Ubuntu18.04 VINS-FUSION OpenCV4适配.</title><link href="https://magicshawn.github.io/2024/10/27/Ubuntu18.04-VINS-FUSION-OpenCV4%E9%80%82%E9%85%8D.html" rel="alternate" type="text/html" title="Ubuntu18.04 VINS-FUSION OpenCV4适配." /><published>2024-10-27T02:15:13+00:00</published><updated>2024-10-27T02:15:13+00:00</updated><id>https://magicshawn.github.io/2024/10/27/Ubuntu18.04-VINS-FUSION-OpenCV4%E9%80%82%E9%85%8D</id><content type="html" xml:base="https://magicshawn.github.io/2024/10/27/Ubuntu18.04-VINS-FUSION-OpenCV4%E9%80%82%E9%85%8D.html"><![CDATA[<h1 id="vins-fusion-运行">VINS-FUSION 运行</h1>

<hr />

<p><strong>相关链接：</strong></p>

<p><a href="https://www.sunnywale.com/show-7-304-1.html"><em>卷帘快门（Rolling Shutter）与全局快门（Global Shutter）的区别</em></a></p>

<hr />

<h1 id="content">content</h1>
<ul>
  <li><a href="#全局快门和卷帘快门的区别"><strong>全局快门和卷帘快门的区别</strong></a></li>
  <li><a href="#克隆下载对应储存库"><strong>安装</strong></a></li>
  <li><a href="#总结"><strong>总结</strong></a></li>
  <li><a href="#reference"><strong>Some Reference</strong></a></li>
</ul>

<hr />

<p><strong>全局快门（Global Shutter, GS）和卷帘快门（Rolling Shutter, RS）是两种常见的CMOS传感器快门技术。它们的不同之处主要在于曝光方式，从而影响了成像效果及在实际应用中的适用性，特别是在SLAM（Simultaneous Localization and Mapping，即同时定位与建图）系统中有各自的优缺点。</strong></p>

<h2 id="全局快门和卷帘快门的区别">一. 全局快门和卷帘快门的区别</h2>

<h3 id="曝光方式"><strong>曝光方式：</strong></h3>

<p><strong>全局快门：</strong></p>

<p>传感器的所有像素在同一时刻同时曝光。这样生成的图像不会因运动而产生形变。</p>

<p><strong>卷帘快门：</strong></p>

<p>像素按行或列逐行依次曝光，通常是从上到下逐行读取，因此不同时刻的像素曝光会存在时间差。这种逐行读取方式容易在相机或物体运动时产生变形。</p>

<h3 id="图像失真"><strong>图像失真：</strong></h3>

<p><strong>全局快门：</strong></p>

<p>即使在高速运动情况下也能捕捉无形变的图像。</p>

<p><strong>卷帘快门：</strong></p>

<p>在运动中易出现“果冻效应”，即直线物体可能会变成弯曲的形状。此外，也可能导致旋转和倾斜物体的变形（如倾斜的水平线）。</p>

<hr />
<p><strong>查看OpenCV版本</strong></p>
<div class="language-bash highlighter-rouge"><div class="highlight"><pre class="highlight"><code>opencv_version <span class="nt">-v</span>

General configuration <span class="k">for </span>OpenCV 4.4.0 <span class="o">=====================================</span>
  Version control:               unknown

  Platform:
    Timestamp:                   2024-10-23T04:11:48Z
    Host:                        Linux 4.15.0-213-generic x86_64
    CMake:                       3.10.2
    CMake generator:             Unix Makefiles
    CMake build tool:            /usr/bin/make
    Configuration:               Release
...
</code></pre></div></div>

<p><strong>错误一:</strong></p>
<ul>
  <li>
    <p><em>CV4版本差异,需要修改宏定义</em></p>

    <p><em>CV_LOAD_IMAGE_GRAYSCALE修改为cv::IMREAD_GRAYSCALE</em></p>
  </li>
</ul>

<div class="language-bash highlighter-rouge"><div class="highlight"><pre class="highlight"><code>/home/dji/VINS_ws/src/VINS-Fusion/vins_estimator/src/KITTIOdomTest.cpp: In <span class="k">function</span> ‘int main<span class="o">(</span>int, char<span class="k">**</span><span class="o">)</span>’:
/home/dji/VINS_ws/src/VINS-Fusion/vins_estimator/src/KITTIOdomTest.cpp:95:39: error: ‘CV_LOAD_IMAGE_GRAYSCALE’ was not declared <span class="k">in </span>this scope
    imLeft <span class="o">=</span> cv::imread<span class="o">(</span>leftImagePath, CV_LOAD_IMAGE_GRAYSCALE <span class="o">)</span><span class="p">;</span>
                                       ^~~~~~~~~~~~~~~~~~~~~~~
/home/dji/VINS_ws/src/VINS-Fusion/vins_estimator/src/KITTIGPSTest.cpp: In <span class="k">function</span> ‘int main<span class="o">(</span>int, char<span class="k">**</span><span class="o">)</span>’:
/home/dji/VINS_ws/src/VINS-Fusion/vins_estimator/src/KITTIGPSTest.cpp:122:39: error: ‘CV_LOAD_IMAGE_GRAYSCALE’ was not declared <span class="k">in </span>this scope
    imLeft <span class="o">=</span> cv::imread<span class="o">(</span>leftImagePath, CV_LOAD_IMAGE_GRAYSCALE <span class="o">)</span><span class="p">;</span>
                                       ^~~~~~~~~~~~~~~~~~~~~~~
</code></pre></div></div>

<ul>
  <li><strong>修改完后，编译成功,存在警告,警告表明系统中有两个不同版本的OpenCV库，它们之间存在冲突,这里不影响</strong></li>
</ul>

<div class="language-bash highlighter-rouge"><div class="highlight"><pre class="highlight"><code><span class="c">#继续编译</span>
catkin_make <span class="nt">-j4</span>
 
...
<span class="o">[</span>100%] Linking CXX executable /home/dji/VINS_ws/devel/lib/vins/kitti_gps_test
/usr/bin/ld: warning: libopencv_core.so.4.4, needed by /home/dji/VINS_ws/devel/lib/libvins_lib.so, may conflict with libopencv_core.so.3.2
/usr/bin/ld: warning: libopencv_imgcodecs.so.3.2, needed by /opt/ros/melodic/lib/libcv_bridge.so, may conflict with libopencv_imgcodecs.so.4.4
<span class="o">[</span>100%] Built target kitti_gps_test
</code></pre></div></div>

<p><strong>更新工作空间源</strong></p>
<div class="language-bash highlighter-rouge"><div class="highlight"><pre class="highlight"><code><span class="nb">source </span>devel/setup.bash
</code></pre></div></div>

<p><strong>修改输出目录– **<em>config</em></strong> 目录下所有子模块的–** <strong><em>xxx_config.yaml</em></strong></p>

<p><em>根据使用需求修改对应的文件夹下的xxx_config.yaml</em></p>
<div class="language-bash highlighter-rouge"><div class="highlight"><pre class="highlight"><code><span class="nb">cd </span>catkin_ws/src/VINS-Fusion/config/[对应文件夹下的xxx_config.yaml]
</code></pre></div></div>

<div class="language-yaml highlighter-rouge"><div class="highlight"><pre class="highlight"><code><span class="c1">#xxx_config.yaml</span>
<span class="nt">%YAML</span><span class="err">:1.0
imu: 0         
num_of_cam: 2  

imu_topic: "/imu0"
image0_topic: "/cam0/image_raw"
image1_topic: "/cam1/image_raw"
#修改输出目录
output_path: /home/dji/VINS_ws/src/VINS-Fusion/outputs
...
</span></code></pre></div></div>]]></content><author><name>mgshawn</name></author><summary type="html"><![CDATA[VINS-FUSION 运行]]></summary></entry><entry><title type="html">卷帘快门与全局快门.</title><link href="https://magicshawn.github.io/2024/10/23/%E5%8D%B7%E5%B8%98%E5%BF%AB%E9%97%A8%E4%B8%8E%E5%85%A8%E5%B1%80%E5%BF%AB%E9%97%A8.html" rel="alternate" type="text/html" title="卷帘快门与全局快门." /><published>2024-10-23T02:15:13+00:00</published><updated>2024-10-23T02:15:13+00:00</updated><id>https://magicshawn.github.io/2024/10/23/%E5%8D%B7%E5%B8%98%E5%BF%AB%E9%97%A8%E4%B8%8E%E5%85%A8%E5%B1%80%E5%BF%AB%E9%97%A8</id><content type="html" xml:base="https://magicshawn.github.io/2024/10/23/%E5%8D%B7%E5%B8%98%E5%BF%AB%E9%97%A8%E4%B8%8E%E5%85%A8%E5%B1%80%E5%BF%AB%E9%97%A8.html"><![CDATA[<h1 id="图像传感器快门差异">图像传感器快门差异</h1>

<hr />

<p><strong>相关链接：</strong></p>

<p><a href="https://www.sunnywale.com/show-7-304-1.html"><em>卷帘快门（Rolling Shutter）与全局快门（Global Shutter）的区别</em></a></p>

<hr />

<h1 id="content">content</h1>
<ul>
  <li><a href="#全局快门和卷帘快门的区别"><strong>全局快门和卷帘快门的区别</strong></a></li>
  <li><a href="#克隆下载对应储存库"><strong>安装</strong></a></li>
  <li><a href="#总结"><strong>总结</strong></a></li>
  <li><a href="#reference"><strong>Some Reference</strong></a></li>
</ul>

<hr />

<p><strong>全局快门（Global Shutter, GS）和卷帘快门（Rolling Shutter, RS）是两种常见的CMOS传感器快门技术。它们的不同之处主要在于曝光方式，从而影响了成像效果及在实际应用中的适用性，特别是在SLAM（Simultaneous Localization and Mapping，即同时定位与建图）系统中有各自的优缺点。</strong></p>

<h2 id="全局快门和卷帘快门的区别">一. 全局快门和卷帘快门的区别</h2>

<h3 id="曝光方式"><strong>曝光方式：</strong></h3>

<p><strong>全局快门：</strong></p>

<p>传感器的所有像素在同一时刻同时曝光。这样生成的图像不会因运动而产生形变。</p>

<p><strong>卷帘快门：</strong></p>

<p>像素按行或列逐行依次曝光，通常是从上到下逐行读取，因此不同时刻的像素曝光会存在时间差。这种逐行读取方式容易在相机或物体运动时产生变形。</p>

<h3 id="图像失真"><strong>图像失真：</strong></h3>

<p><strong>全局快门：</strong></p>

<p>即使在高速运动情况下也能捕捉无形变的图像。</p>

<p><strong>卷帘快门：</strong></p>

<p>在运动中易出现“果冻效应”，即直线物体可能会变成弯曲的形状。此外，也可能导致旋转和倾斜物体的变形（如倾斜的水平线）。</p>

<hr />

<h2 id="二-在-slam-中的优缺点">二. 在 SLAM 中的优缺点</h2>
<p>SLAM算法通常要求高精度的视觉和位置信息，以构建环境地图和实现精准定位。不同的快门技术会直接影响SLAM的效果。</p>

<p>全局快门相机在SLAM中的优缺点
优点：
图像稳定性：在拍摄动态场景时，GS相机能够提供无形变的图像，这对于视觉SLAM的特征提取、匹配和位姿估计非常有利。特征不会因为快门的延迟而错位或扭曲。
高运动精度：在高速运动或机器人应用中，全局快门的同步曝光可以确保捕捉的图像准确反映真实物体的位置，从而在运动中提高SLAM系统的鲁棒性。
缺点：
成本较高：由于全局快门CMOS传感器的设计和制造成本较高，GS相机的价格也普遍高于卷帘快门相机。
功耗更高：全局快门通常需要更高的功耗来驱动同步曝光，并且较难在低照度环境下提供较好的性能。
卷帘快门相机在SLAM中的优缺点
优点：</p>

<p>成本较低：卷帘快门的设计和制造相对简单，因此RS相机的成本更低，应用更加广泛。
功耗较低：相比全局快门，卷帘快门的功耗更低，适用于能耗敏感的场景（如无人机和小型移动机器人）。
缺点：</p>

<p>运动形变：在拍摄动态场景时，卷帘快门会因为逐行曝光而导致图像出现形变，这种“果冻效应”会导致特征点的误差和失配，影响SLAM的定位精度。
运动模糊：在高速运动场景中，卷帘快门更易出现模糊，使得特征点难以被准确提取和跟踪，进而降低SLAM的建图质量。
卷帘快门在SLAM中的应对措施
尽管RS相机在运动形变上有局限性，但一些算法可以在视觉SLAM中通过后处理来减少形变影响：</p>

<p>去卷帘失真：通过分析相机的运动模型，尝试对卷帘快门图像中的“果冻效应”进行校正，使图像更接近真实结构。
融合IMU数据：利用惯性测量单元（IMU）与RS相机进行数据融合，通过IMU提供的姿态信息补偿卷帘快门造成的图像偏移和形变。</p>
<h2 id="三-总结">三. 总结</h2>
<p>全局快门相机适用于动态或高速运动场景的SLAM应用，能够提供高精度、无形变的图像，但成本和功耗较高。
卷帘快门相机适合静态或慢速移动场景的SLAM应用，在成本、功耗上具备优势，但在高速运动中会出现图像形变，影响SLAM的定位和建图精度。</p>]]></content><author><name>mgshawn</name></author><summary type="html"><![CDATA[图像传感器快门差异]]></summary></entry><entry><title type="html">Ubuntu18.04升级-python3.10</title><link href="https://magicshawn.github.io/2024/10/22/Ubuntu18.04%E5%8D%87%E7%BA%A7-python3.10.html" rel="alternate" type="text/html" title="Ubuntu18.04升级-python3.10" /><published>2024-10-22T02:15:13+00:00</published><updated>2024-10-22T02:15:13+00:00</updated><id>https://magicshawn.github.io/2024/10/22/Ubuntu18.04%E5%8D%87%E7%BA%A7-python3.10</id><content type="html" xml:base="https://magicshawn.github.io/2024/10/22/Ubuntu18.04%E5%8D%87%E7%BA%A7-python3.10.html"><![CDATA[<h1 id="python310安装">Python3.10安装</h1>

<hr />

<p><strong>相关链接：</strong></p>

<p><a href="https://www.python.org/downloads/source/"><em>Python Source Releases</em></a></p>

<p><a href="https://www.python.org/ftp/python/3.10.15/Python-3.10.15.tar.xz"><em>Python 3.10.15.tar.xz</em></a></p>

<hr />

<h1 id="content">content</h1>
<ul>
  <li><a href="#更新"><strong>更新</strong></a></li>
  <li><a href="#克隆下载对应储存库"><strong>安装</strong></a></li>
  <li><a href="#特殊情况"><strong>安装后可能的情况</strong></a></li>
  <li><a href="#reference"><strong>Some Reference</strong></a></li>
</ul>

<hr />

<h2 id="更新">一、更新</h2>

<p><strong>因为ubuntu 18.04的原生自带的python 是3.6，实际项目时要求版本需要更高，这就必须的得升级</strong></p>

<div class="language-plaintext highlighter-rouge"><div class="highlight"><pre class="highlight"><code>sudo apt-get update
sudo apt-get upgrade
</code></pre></div></div>

<hr />

<h2 id="克隆下载对应储存库">二、安装</h2>

<h3 id="1-从源码安装">1. <strong>从源码安装</strong></h3>

<p><strong>一般来说选择稍微稳定一点的版本，可以查看对应的支持列表：</strong></p>

<p>官网下载源码包(寻找你需要的版本):
<a href="https://www.python.org/downloads/source/"><em>Python Source Releases</em></a></p>

<p>或者直接命令行下载源码包：</p>

<div class="language-bash highlighter-rouge"><div class="highlight"><pre class="highlight"><code>wget https://www.python.org/ftp/python/3.10.0/Python-3.10.0.tgz
</code></pre></div></div>
<div class="language-bash highlighter-rouge"><div class="highlight"><pre class="highlight"><code><span class="nb">tar</span> <span class="nt">-zvxf</span> Python-3.10.0.tgz 
<span class="nb">cd </span>Python-3.10.0/
./configure <span class="nt">--enable-optimizations</span>

make <span class="nt">-j</span> 6
<span class="nb">sudo </span>make <span class="nb">install</span>

</code></pre></div></div>

<p><strong>安装完成后，输入python3.10，查看是否安装成功</strong></p>

<div class="language-bash highlighter-rouge"><div class="highlight"><pre class="highlight"><code>python3.10 <span class="nt">-V</span>
</code></pre></div></div>

<p><strong>如果安装成功，会显示python3.10的版本信息</strong></p>

<h3 id="2-使用apt安装">2. <strong>使用apt安装</strong></h3>

<p>这个就比较简单了，直接使用apt安装即可,但是很可能没反应，因为ubuntu 18.04的源里面没有python3.10的版本，所以建议从源码安装</p>
<div class="language-bash highlighter-rouge"><div class="highlight"><pre class="highlight"><code><span class="nb">sudo </span>apt-get <span class="nb">install </span>python3.10
</code></pre></div></div>

<h3 id="3-卸载python310">3. <strong>卸载python3.10</strong></h3>

<p><strong>卸载python3.10</strong></p>

<div class="language-bash highlighter-rouge"><div class="highlight"><pre class="highlight"><code><span class="nb">sudo </span>apt-get remove python3.10
</code></pre></div></div>

<p><strong>卸载python3.10的依赖包</strong></p>

<div class="language-bash highlighter-rouge"><div class="highlight"><pre class="highlight"><code><span class="nb">sudo </span>apt-get autoremove
</code></pre></div></div>

<p><strong>卸载python3.10的配置文件</strong></p>

<div class="language-bash highlighter-rouge"><div class="highlight"><pre class="highlight"><code><span class="nb">sudo rm</span> <span class="nt">-rf</span> /usr/local/lib/python3.10
<span class="nb">sudo rm</span> <span class="nt">-rf</span> /usr/local/bin/python3.10
</code></pre></div></div>

<p>而后，需要修改python3的命令，跟pip3 的命令,还有就是apt install安装的跟 解压包安装的python路径不一样， apt 是在 <strong><em>/usr/bin/python</em></strong> 而安装包是在 <strong><em>/usr/local/bin/python</em></strong></p>

<p>查看本地的python</p>
<div class="language-bash highlighter-rouge"><div class="highlight"><pre class="highlight"><code><span class="nb">ls</span> /usr/bin/python<span class="k">*</span>
</code></pre></div></div>
<p><strong>修改 usr/bin/python3</strong></p>

<p>当然以防万一建议先去到对应的目录下查看一下</p>
<div class="language-bash highlighter-rouge"><div class="highlight"><pre class="highlight"><code><span class="nb">sudo rm</span> /usr/bin/python3
<span class="nb">sudo ln</span> <span class="nt">-s</span> /usr/local/bin/python3 /usr/bin/python3
</code></pre></div></div>
<p><strong>修改 usr/bin/pip3</strong></p>

<div class="language-bash highlighter-rouge"><div class="highlight"><pre class="highlight"><code><span class="nb">sudo rm</span> /usr/bin/pip3
<span class="nb">sudo ln</span> <span class="nt">-s</span> /usr/local/bin/pip3 /usr/bin/pip3
</code></pre></div></div>

<p><strong>如果你还要改python权重，就使用下面的命令</strong></p>

<p>注意：***update-alternatives: –install 需要 <链接> <名称> <路径> <优先级>*** 数字代表了优先级，数字越大优先级越高</优先级></路径></名称></链接></p>

<p>这里只是给出方法,不建议使用，因为这样会导致系统默认的python3.6被覆盖掉，导致系统命令无法使用python3.6</p>

<div class="language-bash highlighter-rouge"><div class="highlight"><pre class="highlight"><code><span class="nb">sudo </span>update-alternatives <span class="nt">--install</span> /usr/bin/python3 python3 /usr/local/bin/python3.10 2
<span class="nb">sudo </span>update-alternatives <span class="nt">--install</span> /usr/bin/python python /usr/local/bin/python3.10 1
</code></pre></div></div>

<hr />

<h2 id="特殊情况">三、一些特殊情况</h2>

<p>安装更新后使用过程中大概率会出现各种系统包无法导入的情况</p>

<p>这里给出一些常见的解决办法,当然方法是通用的不局限于 ufw 的问题,像 lsb_release.py 找不到的问题也可以使用类似的方法</p>

<div class="language-bash highlighter-rouge"><div class="highlight"><pre class="highlight"><code>~# ufw <span class="nt">--help</span>
Traceback <span class="o">(</span>most recent call last<span class="o">)</span>:
  File <span class="s2">"/usr/sbin/ufw"</span>, line 26, <span class="k">in</span> &lt;module&gt;
    import ufw.frontend
ModuleNotFoundError: No module named <span class="s1">'ufw'</span>
</code></pre></div></div>
<p>大概率系统中是有ufw的,确认一下,但是是python3.6的，所以需要确认一下</p>
<div class="language-bash highlighter-rouge"><div class="highlight"><pre class="highlight"><code><span class="nb">sudo </span>apt-get <span class="nb">install </span>ufw
</code></pre></div></div>
<p>找一下ufw的路径</p>
<div class="language-bash highlighter-rouge"><div class="highlight"><pre class="highlight"><code><span class="nb">sudo </span>find /usr/lib/ <span class="nt">-name</span> <span class="s2">"ufw"</span>
</code></pre></div></div>
<p>可能的输出如下:</p>
<div class="language-bash highlighter-rouge"><div class="highlight"><pre class="highlight"><code>/usr/lib/python3.6/site-packages/ufw
or
/usr/lib/python3/dist-packages/ufw
</code></pre></div></div>

<p>有了路径后,我们就可以把ufw添加到python3.10的路径下</p>
<div class="language-bash highlighter-rouge"><div class="highlight"><pre class="highlight"><code><span class="c">#参数 -r 表示递归复制,这里ufw是个目录,所以需要加上-r</span>
<span class="nb">sudo cp</span> <span class="nt">-r</span> /usr/lib/python3/dist-packages/ufw /usr/local/lib/python3.10/
</code></pre></div></div>
<p>到此就可以正常使用了</p>

<p>–</p>

<h2 id="reference">四、REFERENCES</h2>

<ul>
  <li><a href="https://blog.csdn.net/m0_53011501/article/details/127992823"><strong><em>python版本问题导致ufw无法使用</em></strong></a></li>
  <li><a href="https://www.cnblogs.com/nobody-/p/17729987.html"><strong><em>Ubuntu 18.04升级Python3.10</em></strong></a></li>
</ul>]]></content><author><name>mgshawn</name></author><summary type="html"><![CDATA[Python3.10安装]]></summary></entry><entry><title type="html">ubuntu18.04(20通用)安装REALSENSE D435深度相机驱动</title><link href="https://magicshawn.github.io/2024/10/21/Intel-REALSENSE.html" rel="alternate" type="text/html" title="ubuntu18.04(20通用)安装REALSENSE D435深度相机驱动" /><published>2024-10-21T02:15:13+00:00</published><updated>2024-10-21T02:15:13+00:00</updated><id>https://magicshawn.github.io/2024/10/21/Intel-REALSENSE</id><content type="html" xml:base="https://magicshawn.github.io/2024/10/21/Intel-REALSENSE.html"><![CDATA[<h1 id="安装-realsense-d435-深度相机驱动">安装 REALSENSE D435 深度相机驱动</h1>

<hr />

<p><strong>相关链接：</strong></p>

<p><a href="https://www.joycekirkland.site/index.php/2021/07/22/ubuntu18-0420通用安装realsense-d435深度相机驱动/">安装 REALSENSE D435 深度相机驱动</a></p>

<p><a href="https://github.com/IntelRealSense/librealsense/blob/master/doc/installation.md">Intel RealSense 官方安装指南</a></p>

<hr />

<h1 id="content">content</h1>
<ul>
  <li><a href="#更新"><strong>更新</strong></a></li>
  <li><a href="#克隆下载对应储存库"><strong>克隆/下载对应 SDK</strong></a></li>
</ul>

<hr />

<h2 id="更新">一、更新</h2>

<div class="language-plaintext highlighter-rouge"><div class="highlight"><pre class="highlight"><code>sudo apt-get update
sudo apt-get upgrade
</code></pre></div></div>

<hr />

<h2 id="克隆下载对应储存库">二、安装SDK</h2>

<p><strong>一般来说选择稍微稳定一点的版本，可以查看对应的支持列表：</strong></p>

<p><a href="https://github.com/IntelRealSense/librealsense/releases"><em>Intel® RealSense™ SDK支持列表</em></a></p>

<p><strong>下载对应版本的SDK (2024-10-21)：</strong></p>

<p><a href="https://github.com/IntelRealSense/librealsense/releases/tag/v2.55.1"><em>librealsense-2.55.1储存库-other version</em></a>         <br />
<a href="https://github.com/IntelRealSense/librealsense/archive/refs/tags/v2.55.1.zip"><em>librealsense-2.55.1.zip</em></a></p>

<p><strong>解压下载的SDK：</strong></p>

<div class="language-plaintext highlighter-rouge"><div class="highlight"><pre class="highlight"><code>unzip librealsense-2.55.1.zip
</code></pre></div></div>]]></content><author><name>mgshawn</name></author><summary type="html"><![CDATA[安装 REALSENSE D435 深度相机驱动]]></summary></entry><entry><title type="html">CAN协议</title><link href="https://magicshawn.github.io/2024/07/30/can_protocol.html" rel="alternate" type="text/html" title="CAN协议" /><published>2024-07-30T02:15:13+00:00</published><updated>2024-07-30T02:15:13+00:00</updated><id>https://magicshawn.github.io/2024/07/30/can_protocol</id><content type="html" xml:base="https://magicshawn.github.io/2024/07/30/can_protocol.html"><![CDATA[<h1 id="can协议">CAN协议</h1>

<p><img src="/img/posts/page2/CAN_Logo.jpg" alt="CAN_Logo" /></p>

<p><strong><em>CAN（Controller Area Network）是一种串行通信协议，用于汽车和其他嵌入式系统中。CAN协议的特点是高可靠性、低延迟和易于扩展。CAN协议使用差分信号传输数据，通过差分信号的电平变化来表示数据位。</em></strong></p>

<p><strong>CAN协议的主要特点包括：</strong></p>

<ol>
  <li>
    <p><strong>多主节点</strong>：CAN协议允许多个节点同时发送数据，每个节点都可以成为主节点，但只有一个节点可以发送数据，其他节点只能接收数据。</p>
  </li>
  <li>
    <p><strong>错误检测和纠正</strong>：CAN协议具有错误检测和纠正功能，可以自动检测和纠正数据传输中的错误。</p>
  </li>
  <li>
    <p><strong>高可靠性</strong>：CAN协议具有高可靠性，可以在恶劣的环境下稳定工作。</p>
  </li>
  <li>
    <p><strong>低延迟</strong>：CAN协议具有低延迟，可以快速传输数据。</p>
  </li>
</ol>

<h2 id="一can物理层">一、CAN物理层</h2>

<p><strong>CAN协议属于异步通讯</strong>，区别于IIC、SPI等同步通讯协议，CAN没有时钟信号，CAN的物理层使用<strong>差分信号</strong>传输数据,。CAN协议使用两根差分信号线，一根为CAN_High，另一根为CAN_Low。CAN_High和CAN_Low之间的<strong>电压差表示数据位</strong>。CAN协议使用差分信号传输数据，<strong>差分信号可以减少电磁干扰</strong>，提高通信的可靠性。</p>]]></content><author><name>mgshawn</name></author><summary type="html"><![CDATA[CAN协议]]></summary></entry><entry><title type="html">demo</title><link href="https://magicshawn.github.io/2020/01/31/test.html" rel="alternate" type="text/html" title="demo" /><published>2020-01-31T14:45:13+00:00</published><updated>2020-01-31T14:45:13+00:00</updated><id>https://magicshawn.github.io/2020/01/31/test</id><content type="html" xml:base="https://magicshawn.github.io/2020/01/31/test.html"><![CDATA[<h2 id="测试">测试</h2>

<p>这是我的第一篇博客，测试一下！</p>]]></content><author><name>mgshawn</name></author><summary type="html"><![CDATA[测试]]></summary></entry></feed>